Tuesday, November 27, 2012

Jorgensen Vise, Where have you been all my life?

I have a fast and famine relationship with woodworking.  One year it will be all I think about, the next I don't want to think it about it at all.  Over the last few years I have been trying to build a relationship with hand tool wood working.  A few years back I built a Roubo type workbench, but funding got a bit tight and I never got to really finish it.  I just had a legs and top.  It didn't have any vises or frills.  For my 40th birthday my wife buys me a Class with the Schwarz at the Marc Adams school of woodworking.  This rekindled my fire for woodworking.

I found myself getting very frustrated with the my bench.  I couldn't find a decent way to hold the work while I planed.  I needed a tail vise, plain and simple.  As with most of my purchases, this started with what some might call a business plan.  I have to come up with a well reasoned argument for why I need this tool, how often I will use it.  This will include demonstrations and sometimes....begging.    My wife has to be this way because if she didn't I would be living in a cardboard box huddled around my tools.  Luckily, my wife was able to free up the funds for me to buy a Jorgensen 7" vise and some Veritas round bench dogs.

When the vise arrived I quickly got started on installing it.  Installation was pretty straight forward.  Just had to mortise out a place on the end of my workbench for the vise.  I fired up the router and made pretty short work of it.  A couple bolts later and I had the vise pretty much installed. 

Installed Jorgensen 7" vise

I added a chop and glued on some black leather and drafted a buddy to take a turn drilling dog holes.

I discovered a bit of an issue.  The quick release mechanism was not working consistently.  When you would turn the screw in to tighten it would just freely spin.  If I would just reach under the vise and barely touch the nut it would start to engage.  I ask my brothers on Woodnet Forums and no one really had a solution.  I continued to play with it and see if I could wrap my head around it.  If you are not familiar with these vises here is what the nut looks like.


If you see on the sides of the nut there are little bosses.  The limit how much the nut will spin free spin before it starts to engage or disengage the threads.  I suspected that one of the bosses was letting the nut turn just a little too far.  My first thought was to weld a spot on the boss.  Since I don't know too much about welding I decided to try something else.  What I decided to do was glue a piece of leather onto the boss that was giving me issues.


You can just see the little piece of black leather I added to the boss.
Unlike most of my on the cuff "repairs," this one worked like a charm.  I have been using the vise now for a couple months and it has never failed to engage.  I'm sure I could have returned the vise, but I would generally have to pay for the shipping and these things aren't exactly light.

As for the vise...I love it (after it was fixed at least).  I honestly don't know why I didn't do this earlier.  The vise doesn't have any sag and seems to resists racking well.  I actually like the bench I built twice as much as the Lie-Nielsen benches that we used at Marc Adams.  I love the flexability of round dogs.  It gives me the option to use the dog holes for my dogs or my hold fasts.  My bench is also heavier and doesn't try to "walk" away on me. 

 I added a row of dog holes down my bench (5" from front of bench, 3" on center).  This seems to work out great.  I would advise anyone to not skimp on the dog holes.  I also chose to add a dog hole in my chop instead of using the dog that come with the vise.  I wasn't a big fan of the built in dog.  It wasn't quite tall enough for my installation and it looked like it might bend backwards and allow the wood to creep up it.  Adding the dog hole in the chop was simple and has worked great.

Adding this vise was like a archaeologist finding the rosetta stone.  My hand planes started to make sense to me.  Planing boards flat didn't seem like such a task.  I couldn't actually devote my time and brain power to the task at hand instead how to secure the work to the bench.  It seems every so often in my woodworking life I cross a threshold where things just seem to instantly become clearer.  These ah ha moments are what keep me interested in this craft.

Monday, November 19, 2012

Stanley 102, a real Sweetheart

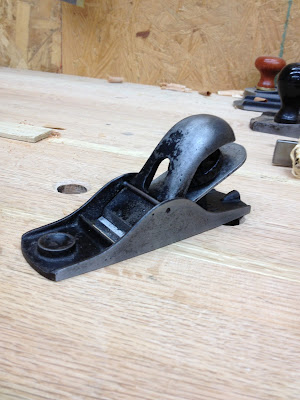
While making the rounds at a local antique mall I discovered this little plane sitting on the half price shelf.  Its a Stanley Sweetheart 102 block plane from the 1920's, as best I can tell.  It had a few rust issues, but nothing I couldn't handle.  It was all there and iron was is pretty good shape.  For $7.50 she had to come home with me.


Staley 102 after a little cleaning up.
 This is a simple little plane but I love the size.  A lot of folks today would probably refer to this plane as an apron plane.  Its a little smaller and a full size block plane and it doesn't have any knobs or levers to get get hung on things.  This would be great to keep in your shop apron to tag along with you to buy lumber.  One of my favorite parts of the plane is that it has a sleek coffin shape.


It has a slight coffin shape making it a even sleeker plane.

I probably wouldn't use this plane as my every day user but it still has a place in my shop.  I find in my shop that my block plane gets used for different things and I tinker with the depth of cut a lot.  This little stanley is a no frills plane;  no depth adjuster, no lateral ajustment.  I'm also a big guy and this plane it a little small for my hands.  If my finger is in the front dimple then my palm doesn't rest on the rear of the plane.  This makes it pretty hard exhausting on my fingers.  For someone with small hands this plane would be perfect, but for now I'll continue to use my Record 60 1/2 as my everyday block plane.  However, I feel certain this little guy will make himself useful.


Wednesday, November 14, 2012

Ye Ol' Woodie

Recently I come accross this plane at a local antique market and had a hard time putting it down.  Normally when I find woodies like these they are pretty much trashed.  It all ways seems they have missing parts, broken handles, or a bit of termite damage.  This one seemed to be in great shape and I was running out of excuses not to add it to the "collective."


The plane is a 26" long joiner/try plane.   It was produced by the Auburn Tool Co. in the last of 1800's.  After a bit of fussing with the iron and chip breaker and flattening the sole she was ready for action.   These planes make a completely different sound when you use them.  It sounds like you tearing a piece of paper in half.  This is my first woodie like this and the blade adjustment is going to take some getting used to.  While I have read how to adjust these planes, in practice it isn't so easy.  I have a hard time setting the iron for a light shaving.  When tapping on the button ro release the wedge I tend retract the iron way too much.  It may be one of those things that someone has to actually show you how to do.


I love the plane and I'm sure i'll find a place for it in the rotation.  I would love to find a fore plane like this one.  These woodies seem to excell and taking off heavy shavings. I also get quite a bit of satisfaction at using a tool that is 120+ years old and it finally found a home that will put it to good use.  It almost makes me want to grow a handlebar mustache.